Pages

Tags

.hack// series (14) .hack//Infection (6) .hack//mutation (6) .hack//outbreak (7) .hack//quarantine (5) 1bitHeart (4) A Bird Story (1) A Mortician's Tale (1) Ability Up (11) About Love Hate and the Other Ones (1) Achievements (6) Ahriman's Prophecy (1) Aladdin (1) Alice Elliot (6) Alicemare (1) Alphadia Genesis (5) Amnesia: Memories (1) An Octave Higher (2) Analogue: A Hate Story (1) Anodyne (4) Artefact (2) Artefact Adventure (1) Aveyond (2) BAD END (2) Bad Service (1) Before I Forget (1) Best Armour (16) Best Weapons (26) Bestiary (1) Beyd (1) Bioshock Infinite (1) Black Home (1) Blitzball (1) Blush Blush (1) Boss Fight (1) Boyfriend Dungeon (1) Boyfriend Maker/Boyfriend Plus (1) Braid (8) Breath of Fire (24) Breath of Fire II (18) Breath of Fire III (37) Breath of Fire IV (25) Breath of Fire Series (10) Breath of Fire: Dragon Quarter (4) Brothers (1) Casper (1) Cave Story (1) Celestian Tales: Old North (2) Cheat Engine (1) Cheats (1) Cinderella Phenomenon (3) Circuit Logic (1) Coffee Talk (1) Collectibles (11) competition (1) Completion Project (21) Confines of the Crown (1) Cozy Grove (1) crafts (1) Crash Bandicoot 2 (2) Croc: Legend of the Gobbos (2) Crush Crush (1) Crystal Story (2) Crystalline (1) Cubicle Quest (1) Dark Parables (5) Death Stranding (1) Deis (2) Deponia (1) Dèsirè (2) Dice (1) Discworld (1) Disgaea (1) Draft (1) Dreamworld (1) Earth Must Die (1) eBay (1) Ehrgeiz (3) Epic Battle Fantasy III (1) Equipment (3) eReader (1) Eternal Senia (1) Factorio (1) Fairy Village (1) Fanfiction (8) Final Fantasy (4) Final Fantasy II (2) Final Fantasy IV (3) Final Fantasy IX (7) Final Fantasy Series (5) Final Fantasy Tactics (1) Final Fantasy V (1) Final Fantasy VII (7) Final Fantasy VIII (10) Final Fantasy X (7) Final Fantasy X-2 (4) Final Fantasy: Crystal Chronicles (3) Fishing (11) Forget Me Not My Organic Garden (1) Freeware (8) Frontierville (1) Future Learn (1) Game (1) Game-Design (1) Ghost on the Shore (1) Ghost Trick (1) Giving Up (1) God Only Knows (1) Gone Home (1) Grunty (1) Guide (97) GymPact (1) Habitica (3) HabitRPG (3) Harry Potter and the Philosopher's Stone (1) Hellblade: Senua's Sacrifice (1) Hex Manipulation (1) Hitman GO (1) Horizon Zero Dawn (2) HuniePop (1) I Love You Colonel Sanders! (1) Idle Evolution (2) Imposter Factory (1) incentive (4) Incomplete (7) Interpretation (11) iOS (1) IRL (4) Jewish Screenshots (1) Justice for All (1) Kingdom Come: Deliverance (1) Kobo (2) Kongregate (1) Koudelka (2) Labyrinthine Dreams (1) Lake of Voices (1) Later Alligator (3) Legacy Challenge (53) Level Grinding (3) Liar (1) Little Goody Two Shoes (1) Little Rocket Lab (1) Littlewood (1) Long Live the Queen (2) Lord of Twilight (1) Lost Phone Series (1) Manillo (2) Marie's Room (1) Masters (9) Memento (1) Minami Lane (1) Mini-Game (5) missed messages (1) Mobile (1) Monster Camp (1) Monster Magic (3) Monster Prom (4) Murder by Numbers (1) My Time at Portia (1) Nina Wyndia (2) Nintendo DS (1) No Case Should Remain Unsolved (1) non-gaming (3) Notes (20) Octopath Traveler (2) Official Guides (1) Online Courses (1) Pacman World (1) Pact (1) Paradise Killer (2) PC Building (1) Persona 4 (4) Pheonix Wright Ace Attorney (1) Phoenix Wright (7) Pikmin Bloom (1) Plague Inc (1) Playing All My Steam Games (5) Pokemon (1) Princess Maker 2 (4) Princess Maker Series (3) Programming (1) Project Zero (2) PSYCHO-PASS Mandatory Happiness (3) Quick Overview (2) Rant (2) Rebuild (1) Recettear (1) Review (14) Science Girls! (1) sewing (1) Shadow Hearts (3) Shadow Hearts Series (8) Shadow Hearts: Covenant (17) Shadows and Lies (1) Shopping List (5) Sidequest (12) Sims 3 (53) Skyrim (1) Solomon's Club (1) Speed Dating for Ghosts (1) Speed Run (1) Spiderman (2) Spring of Myst (1) Spyro (2) Star Ocean: Til the End of Time (2) Stardew Valley (1) Stat-Raising (6) Steam (2) Stories Untold (1) Storyline (7) Street Fighter (1) Super Mario World (1) Tailor Tales (1) Tales of Symphonia (2) Tarkov (3) Tarzan (1) The 11th Hour (1) The 13th Doll (1) The 39 Steps (1) The 7th Guest (1) The Banner Saga (5) The Crooked Man (2) The Forgotten City (1) The King's Request (1) The Novelist (1) The Path (1) The Quiet Man (1) The Sacred Tears TRUE (1) The Seance at Blake Manor (1) The Sexy Brutale (2) The Sims (54) The Suicide of Rachel Foster (2) the white chamber (1) The Yawhg (1) Theory (1) Thunderhawk (3) Tigger's Honey Hunt (1) Tips (1) To Be or Not to Be (1) To the Moon (1) Trivia (22) Turing Test (1) Unlimited Cash (4) Vampire Survivors (1) Vandal Hearts II (4) Visual Novel (1) Walking Over Alice's Grave (4) Women in Games (3) Work-in-Progress (4) X-Men: Mutant Academy 2 (1) Xenosaga (1) Yuna (3) Yuri Hyuga (8) Zero Escape (2) Zodiac Challenge (53)

Tuesday, 3 February 2015

Final Fantasy VII - Spoiler-free Item, Achievement & Subquest Walkthrough, Part 1

The Reactor

 - Examine both soldier's bodies for potions.
- First Battle: Achievement.
- After Jessie unlocks the door, check the room in the bottom right for a chest containing a Phoenix Down.
- There's a potion on the ground after the first ladder.
- There's a Restore Materia on the path on the screen after you pass the save point.  Note that you can't equip it yet.

Boss: Guard Scorpion

Spend a minute or two gaining Barret and Cloud's limit breaks before the battle if you like.  The boss will be summoned after Cloud plants the bomb.

If you do attack while its tail is up, it'll counter-attack both characters with a laser that does 70-80 damage and easily fills their limit gauges halfway.  May be worth doing for the extra damage at this point.  Use a potion each afterwards to make sure you don't die on the way out.

- Cloud's First Limit: Achievement.
- Barret's First Limit: Achievement.

- Speak to Jessie by the ladders, else the game will make you run back for her.
- Pick up a potion while walking through Midgar.
- You'll be fully healed after exiting the reactor so go ahead and fight the soldiers for the bits of gil and exp.


Meeting Aeris

- if you head right from the train, you can fight in the Train Graveyard for a bit.  It's a nice place to gain money early on, since the Mono Drives have ethers which they drop, or which you can steal from them later on.  They sell for 750 gil, which is a nice chunk of change at this point.
- in the morning, head to the weapon shop, south of the bar.  You can buy some new equipment here, and pick up some all materia and an ether on the second floor, in the 'Beginner's Hall'.
- you can find an item shop to the left of the weapon shop.  It has Fire materia and medicine.

Train

- Save first, as there are some quick-time events coming up.  They begin after you talk to Tifa on the train.
- Run back to the guy right at the back of the first car when the countdown starts; talk to him for a Phoenix Down.
- Speak to the guy right at the lower left of the second cabin, and answer 'yeah...' for a High Potion.
- in the third cabin, you will be pickpocketed.  When the words "heehee" show up on the screen, chase the guy down and tell him "that's right" to get your item back.

Tunnels

- there's an ether in the middle of the tunnel.
- there's a potion in the corner opposite Jessie.
- there's a tent near the save point.
- there's a chest containing an ether on the way out, in the room after the elevator.

Boss: Air Buster

Weak against Bolt and being attacked from behind.  Time your limits.

- Tifa's First Limit: Achievement.

Church 

- Push the barrels in the following order; top left, top right, lower right.

Sector 5

- there's an item shop and a materia shop here.
- go to the house in the lower right and examine the posters on the highest floor.  You'll find Turtles Paradise Newsletter #1.  Do not take the 5 gil in the drawer - you'll get a better prize later if you don't.
- You can buy more Titan Bangles in the weapon shop at the top of the screen.
- You'll find an ether and a Cover materia in the garden to the right of the save point outside Aeris' house.
- When Cloud wakes up, there's a potion and a phoenix down at the end of the bed.

Sector 6

- Ask for a dress that's "soft" and "shimmers".
- win the squat contest in the gym for a blonde wig.
- head to the restaurant near the save point and buy a meal.  If you say "it was all right" you'll receive a Pharmacy Coupon in exchange.  Swap the coupon for a digestive at the medicine shop (south of restaurant).  Finally, give the digestive to the woman in the bar's toilet to obtain Sexy Cologne.
- Go to the shop north of the save point.  The owner will ask you to pick up an item from the inn.  Stay at the inn, and buy the most expensive item when offered a choice.  Take it back to the store to exchange it for a Diamond Tiara.
- Head back down to the Honeybee Inn.  The guy you pass on the way will give you his Member's Card.
- Choose the Group Room to obtain the Bikini Briefs or the &$#% Room for Lingerie.  Due to a glitch in the game, it doesn't actually matter which underwear you obtain.
- Finally, head to the northernmost room in the Honeybee Inn and ask the girls to put make-up on you.  It's random whether they do a good job or not, but with the other items, it shouldn't make a difference.
- there's an ether in the basement where you find Tifa.
- pick up the hyper from behind Don Corneo's bed.

Sewers

- Grab the potion that's near where you land.

Boss: Aps

Weak again Fire.  I had all of my characters with the Fury status, so they were using their limits every other turn.

- Aeris's First Limit: Achievement.

- Pick up the Steal materia on the way out.

Train Graveyard

- Go inside the train near the save point, and out of the doorway further north.  There's a Hi-Potion hidden in the nearby barrels.
- There's also a Hi-Potion on top of this train. 
- Run over the trains right to the top left of the screen to find an
Echo Screen hidden in another barrel.
- There's another potion in the train on the right of the screen.
- You can pick up one final potion just before you leave the area.
- You may fight Eligors in this new area.  Try to steal a Striking Staff for Aeris.  Also try to steal Ethers from Deenglows, or try to win Graviballs from them (if you steal an item they won't drop another, so it is a choice).  Graviballs cast demi, and will be useful against the Midgar Zolom.  Ethers just sell for a lot.
- There's another potion on the left of the screen here.
- Check the leftmost barrel for an ether.
- Finally, there's a Hi-Potion on top of one of the trains here.

Boss: Reno

If Reno puts a pyramid on one of your characters, use a physical attack to remove it.  You can build up Tifa and Cloud's limit breaks on the way up, and I had all of my characters in the fury state so they could keep pummelling Reno with them.

Playground and Sector 5

- There's a Sense Materia near the playground's exit.
- The kid in Sector 5 will give you a Turbo-Ether if you didn't steal his 5gil earlier.
- You can pick up a Phoenix Down in the room at Don Corneo's that you couldn't enter earlier.
- You can buy three batteries from the guy in the Weapon Shop.
- Finally, you can pick up an ether by using the third battery.

Shinra Headquarters 

- if you choose to go up the stairs, you'll find an Elixir halfway up, on the fifth screen.  However, if you storm in the front you'll get a chance to find the Turtle's Paradise #2 poster, which is at the back of the first floor.  Compromise; storm in first, then go back out and head up the stairs.

- Keycard 60 is received automatically following a battle.

- Pick up Keycard 62 from an NPC on floor 61.

- You can get Keycard 65 from Mayor Domino on the 62nd floor.  You'll need to guess his
password.  In order to find the password, you'll need to look in each of the four libraries for the files that don't fit.  Each file as a number in front of it; count that many characters along (not including spaces) and that's one of the letters for the four-letter password.  Get the password on the first try and you get an Elemental materia.

- the 63rd floor is optional, but you can gain three items here.  First, head to the machine to the right; it will tell you how the floor works.  In short, you can open three doors.  The pictures show you which doors to open.  You can pick up the first coupon after opening your second door.  Once you have it, climb into the air duct and head over to the second coupon.  Finally, head out of the room and open your last door to pick up the final coupon.  Get back into the air duct and head to the first room to trade your coupons for a Star Pemdant, a Four Star, and an All Materia.

- on the 64th floor you'll find a save point and a place to take a nap.  There are a few things to do up here.  Buy the Shinra Gym Special Drink from the vending machine in the top left of the gym area and then bang on it; you'll get something from it later.  Also check the lockers for an Ether, a Phoenix Down and Cait Sith's ultimate weapon, which Cloud will refuse to take at this point.

- on the 65th floor, you'll need to get the Shinra model pieces from the chests and put them into the model.  Eventually, the chest containing the keycard will unlock.

- on the 66th floor, climb into the airvents (you'll find an entrance in the toilets) and watch the meeting.  Then follow Hojo to the 67th floor.

- You'll find more random encounters on the 67th floor.  Try to steal Carbon Bangles from the Moth Slashers and a Hardedge from a Soldier:3rd.  After the scene, pick up a Poison Materia from the chest.

Boss: H0512

This boss absorbs poison and gravity, halves lightening, and comes with mooks.  It also frequently casts poison on your party.  You can protect from this with the star amulet and with the poison + elemental materia in someone's armour.  Casting Fire and Ice over all the enemies will help you take them out faster.  Note that you will have to choose between sending Barret or Tifa away, so only prepare one of them to help.

- Red XIII's First Limit: Achievement.
- Pick up the Enemy Skill Materia after the battle.
- You can pick up the 68th floor Keycard from an employee on the upper level of this room.  There are two potions in plain sight near him.
- You'll pick up another two potions on your way to the elevator.

Boss: Hundred Gunner & Heil Gunner

These are both long-range enemies, so only Barret can attack physically.  It's weak against lightening, so have one of your other characters use that, and the third character use any other kind of magic skill to get in a few blows.

You'll battle these enemies one after the other, with Barret, Aeris and Red XIII.

Boss: Rufus

You'll face Rufus with only Cloud.  Take the dog out first because it will cast protective magic on Rufus.    Both are weak to Poison.

Boss: Motor Ball

You'll face this boss after the motorcycle minigame.  It's strong against fire, weak against lightening.  You'll probably have a couple of limit breaks to play with, too.  You'll set up your party for this before the motorcycle bit.

Kalm to Junon

- You can learn the Enemy Skill: Matra Magic from the custom sweepers in the area around Midgar.  The character holding the materia needs to be hit by the skill, survive, and then you must win the battle in order to actually learn it.  You can also steal Atomic Scissors from them, which is a bit of an upgrade for Barret. 

Kalm
 
- During the flashback in Kalm, explore Tifa's house, play on the piano and tell Tifa you jammed on it.  You'll receive an elemental materia later in the game if you do.
- After the flashback, head back upstairs and examine the cabinet behind the stairs.  Check five times and you'll get a megalixer.
- Check the house to the right of the inn.  You'll find an ether.
- You'll find another ether in the house to the right of that, in the middle of the row of three.
- In the final house in the row you'll find a Peacemaker and a Guard Source.
- You'll find another ether in the house on the other side of the square.
- The materia store has some new spells for you; they have the Earth and the Heal Materia.

Chocobo Ranch and Marshes

- Speak to the Chocobo at the fence and choose the first option to get the Choco/Mog Materia.
- Buy the Chocobo Lure Materia from Choco-Billy.
- You can learn Level 4 Suicide from Mus near the chocobo ranch.
- Once you have Level 4 Suicide, find a level 16 Chocobo, feed it some Mimett greens and then cast the skill.  It'll respond with Chocobuckle.  Level 16 Chocobos are accompanied by two Elfadunks. 
- After earning Chocobuckle, catch a Chocobo and head across the marsh to the Mythril Mines.

Boss: Midgar Zolom

This fight is totally optional.  You can dodge with a Chocobo if you'd prefer.

I had Cloud at level 16 with elemental + fire in his armour, a talisman accessory and a carbon bangle in his armour.  My other two characters were as follows; Tifa with sense and Bio, and Red XIII with recover + all.  All characters had full limit breaks, were in the back row and had the sadness status.

Have Tifa use Sense while Cloud and Red XIII toss Graviballs at the Zolom.  This will bring it down to 2250 HP.  Have Tifa cast bio.  Whoever takes the Zolom below 2000 hp, or whoever attacks it first when it gets there will be wiped out; have that be Tifa, with either Choco/Mog or her limit.  When it gets to below 1000hp from poison damage have Cloud defend while Red XIII uses his limit.   The Zolom will attack with Beta and then follow it up with a physical attack on Cloud, the only character left standing.  Cast Beta right back at it to win.  Or, for that last bit, heal and defend until it gets to 400hp or so, then attack to provoke it to cast Beta.  The poison damage should kill it before it can follow up with another attack.

Mythril Mines

- You can learn Flame Thrower from the Ark Dragons in here, and steal Grand Gloves from Madouges.  
- Go right from the entrance.  You can pick up an Ether on the steps and a Tent in the chest at the top.
- Climb the vines in the left corner of this room, at the bottom of the stairs, to find a Long Range materia.
- Head left from the entrance then down to the bottom right corner to find a chest containing a mind source.
- In the room north of the exit you can find an Elixir and a Hi-Potion.
- This area is great for building limits; you can take out groups or 4-5 enemies with Choco-Mog and quickly rack up kills.  I recommend taking the time to do this for Aeris early on if you intend to get her final limit break.

Junon and Fort Condor

- You can meet Yuffie in any forest on the world map, and you only have a 12.5% chance of encountering her near Junon.  If you want to, just run around until you battle a Mystery Ninja.  After you do, there'll be an event.  Make sure you don't choose any option that would require you to take your eyes off Yuffie (open a menu, including the naming menu, use the save point, etc) and she'll join you.   You can also steal a Boomerang from the Formula enemies in the forest for her.

If you must know, the correct answers are "not interested", "petrified", "wait a second", "that's right" and "let's hurry on".

- Get Yuffie: Achievement.

- You can take part in the first Fort Condor battle now, FC Battle 1.  The reward will be a Magic Comb for Red XIII, which has three slots with double materia growth.

Junon

Boss: Bottomswell

Prepare Cloud with the long-range materia and elemental + Choco/Mog in his weapon.  It'll allow him to deal double damage to the boss.  Beta does a great deal of damage.  If he traps you in a bubble, attack the bubble with magic to disperse it. 

- After the scene with Tifa, before going back to Priscilla, head back to Fort Condor for FC Battle 2.  You'll get the best prize if you don't miss any, and if you never have to battle the enemy yourself.  This one earns you a Peace Ring.
- Head back to Junon to get the whistle and the Shiva Materia from Priscilla.
- Immediately after getting the whistle head back to Fort Condor for FC Battle 3.
This one will get you three Ethers.
- To get Mr Dolphin to lift you up in the right place, don't move at all and blow the whistle twice.  The second time will get you where you need to be.
- For the parade, watch this video.  You have to be very close to the soldier next to you to trigger the shouts for the rifles.
- The Materia store has Seal and Revive, both of which are new to you.
- You can find another Enemy Skill Materia in the Beginner's Hall.
- On the second floor of this building, you'll find a 1/35th Soldier, a Mind Source and a Luck Source.
- On the third floor you'll find a Guard Source and a Power Source.
- In the next to furthest house in the second major area of Junon you can find another 1/35th Soldier on the second floor, and a Speed Source on the first floor.  It's the hotel where a Shinra Manager is staying if you want more direction.
- Finally, you can earn a Force Stealer if you achieve 100 or more points during the Rufus send off.

Cargo Ship

- Grab the Ether from the nearby chest.
- Yuffie is blocking an All Materia.  Give her a Tranquillizer if you want.  She'll move eventually, with or without it. 
- After exploring the ship and speaking to everyone, Aeris will ask if you've seen Barret.  After she says that, you'll be able to access more of the ship.
- After forming a party, you'll find random enemies in the cargo room.  Steal some Shinra Betas from Marines.  Use Headbands to protect whoever has steal from sleep.  Remember to grab the All Materia in here.
- In the now-unguarded room north of the cargo room, you'll find a chest containing a Wind Slash.  Use the ladder on the left to reach the upper level.

Boss: Jenova*BIRTH

Jenova can't be poisoned and graviballs won't help you here.  You can slow her if you want.  A few castings of Beta should take her out fairly quickly.

- Yuffie's First Limit: Achievement.

- Pick up the Ifrit Materia from the floor.

Costa Del Sol

- Go into the first house across the bridge.  There's a Fire Ring, Power Source and a Motor Drive for Tifa in here.  You can also buy the house for 30,000gil.

Mt Corel

- After the save point, head for the chest containing a W Machine Gun.  When the tracks break beneath Cloud, don't press the button to avoid falling.  Instead, as you fall, hold the left directional button and keep hammering OK.  You'll pick up a wizard staff as you climb back up.
- While running around, try to steal a few Right Arms from Bombs.
- On the lower tracks, there'll be another weak point.  Hold right this time and grab the Star Pendant.
- There's a Turbo Ether and a Transform Materia a little further on.  They're glowing bright pink and green respectively; you can't miss them.
- Leave the screen following the upper tracks and flip the switch in the cabin at the end to lower the bridge (see image).
- Walk past the hut and climb the mountain to find a nest.  If you choose to take the treasure (10 Phoenix Downs) you'll need to fight the mother Cockatalis.
- After crossing the bridge, follow the tracks down to find a hidden hut.  There's a Tent, a Mind Source and a Power Source in here.


North Corel

- There's an ether in the pot in the house to the right.  Absolute Steve's guide has more tips on how to get it.
-  you can learn Aqualung at this point; head out of North Corel and to the chocobo tracks on the eastern side of the desert.  You'll sometimes run into harpies.  You can max out four enemy skill materias all together, so you might want to wait for this one until you can learn it for three or four at once.

Gold Saucer

- I bought the 30,000 lifetime ticket, because I suck at earning GP.  If you don't, you can win 300gp and buy one in Wonder Square.
- You can view Turtles Paradise Newsletter #3 in the hotel at the Ghost Square.  It's in the lobby, near the sign that says 'shop'.
- You'll meet Cait Sith at Wonder Square.  He has the Manipulate Materia, which will be very useful when learning limit breaks and enemy skills.
- You can also earn GP at Wonder Square.  You'll get an easy 30 for the Mog's House Game (5 Kupo nuts, then 3), 10GP for the G-Bike (plus a Speed Source the first time), and as many as you like for the basketball game (up to 300 for 44 shots in a row).  Throw as soon as the ball touches Cloud's hair.
- At the Speed Square you can earn Aeris' ultimate weapon, the Umbrella, if you earn more than 5000 points.  It costs 10GP per play.  Personally, I'd wait until later; that way you can earn 50-60gp can save outside, run in, have 5-6 goes, then rinse and repeat until you win it.  If you try now you won't be able to leave, and you'll need to pay 5gp to save.
- The game will continue from Battle Square.

Corel Prison

- Once you have Barret in your team, head up to the desert then right.  You'll find a junkyard which has both Bullmotor and Death Claw enemies.  The Bullmotor enemies can use Matra Magic while the Death Claw enemies use Laser.  Remember you have a new enemy skill materia which doesn't yet have the former!  Use manipulate to make sure they hit the right target.
- From the junkyard, had north to fight Dyne.

Boss: Dyne

Give Barret a restore materia and a long range weapon and stick in him the back row.  Try using Beta on Dyne.  Two castings should take him out.

Chocobo Races

- After all of the talking, pick up the Ramuh Materia in the top right of the jockey's room. 
- You'll get as many chances as you like to win the race.  On the psx, holding R1 and R2 will cause your chocobo to gain stamina, slowly.  On my settings on Steam, it was R1 and L1.

Optional Extras with the Buggy

- You can pick up Aqualung from Harpys in the desert around Corel Prison at this point.
- Drive south past Gongaga and find a Beachplug on the beach.  Manipulate them to learn Big Guard.
- You can learn Frog Song from the Touch Me's near Gongaga.
- Head back to Costa del Sol - drive northeast past Gold Saucer - and ride the buggy into town.  A guy near the boat will take you over the sea.
- Complete FC Battle 4 at this point.  You'll get a megalixer for it.
- Look for Zemzeletts near Fort Condor.  Manipulate them to learn White Wind.
- Head to the cave northeast of the Mythril Mines (see picture).  If you've fought a number of battles ending with two even numbers (ie, 22, 44, 66) you'll get a Bolt Ring.  If the numbers are odd, you'll get Mythril.  You'll need the Mythril to get Aeris' final limit break.
- At this point, you can head back to Gold Saucer and gain Aeris' ultimate weapon, the Umbrella.  You'll need to earn over 5000 points.
- You can also participate in the Battle Square battle now. You won't miss out on much if you wait; the Champion Belt is nice to have, but you can win it for less later once the better prizes start showing up.
- At this point, I took Aeris back to the Mythril Cave and had her defeat crowds of enemies with Choco-Mog until she had all her first limit breaks for each level.

Gongaga

- This area is optional.

Boss: Reno & Rude

Not difficult.  Try to defeat them together, else one of them will run off and you won't get their dropped Fairytale and X-potion.

- You'll find the Titan Materia in the reactor Scarlet examines.
- In Gonagaga town, you'll find an X-potion in a chest in the inn.
- You'll find a White M-Phone for Cait Sith in the house near the inn.
- Take the northern route out of town, and pick up the Deathblow Materia on the way.

Cosmo Canyon

- Cosmo Canyon is west of Gongaga.  Park the buggy as far away from Cosmo Canyon as possible, else it will breakdown and you won't be able to get back to Fort Condor for the next battle.
- Head to the inn first; the door is right behind the raised bit with the fire.  You'll find Turtles Paradise Newsletter #5 on the wall, and an elixir hidden in the bedroom.
- Follow Red XIII upstairs to the weapon shop.  Turtles Paradise Newsletter #4  is posted near the counter.
- The materia shop has Transform, Mystify, HP Plus and MP Plus (you can also pick up those first two in Gongaga).
- Before going through the steel door, head back to Fort Condor for FC Battle 5. You'll get five Hi-Potions for this.
- You can learn Death Sentence from the GI Spectors.
- One of the breakable rocks will open the door to the next section.  In this new section, walk left over the goo - walk, I said - and take the exit back down into the previous screen to get the Added Effect Materia.
- Go back into the second area, back over the oil slick, and down the stairs.  There's a Black M-Phone and an ether down here.
- In the next area, take the path one from the end on the right.  There's an X-potion hidden at the end.
- Take the path one from the end on the left.  There's a fairy ring hidden down on the left side.
- When you head north, you'll see a treasure chest containing a Turbo Ether on the left.  You can walk through the wall after the web to reach it.

Boss: Gi Nattak

Protect yourself against fire.  This boss is undead, so try using White Wind on it.  You can kill it instantly with an x-potion or a phoenix down, but there's a chance to miss.

- Pick up the Gravity Materia after the boss fight.
- Head back to Fort Condor for FC Battle 6.  Again, the prize is five Hi-Potions.

Nibelheim

- the man in black in the inn will give you a Luck Source.
- there's another man in black in the house to the left of the inn who will give you an elixir.
- in Tifa's house, you can pick up a Platinum Fist and a Turbo Ether from men in black capes.  You can also get Tifa's savings of 1g if you play the piano now, and if you played it in the flashback earlier.
- the men in black in the last house will give you another Luck Source.

Shinra Mansion

- You can learn the enemy skill ???? from the Jersey enemies.  They won't use it after being attacked, so don't do anything until after you've learned it.  You'll find them near the safe which we'll come back to later.
- there's a Silver M-Phone in the room off the stairs to the right.  If you go under the stairs and into the room on the right there, you'll find a Twin Viper.
- Upstairs on the left you'll find an Enemy Launcher.  On the right, you'll find a Magic Source.  Head down into the library basement, where you'll find a Destruct Materia.
- Finally, you can pick up Red XIII's final Limit Break manual by opening the safe and facing an enemy.  The combination is right 36, left 10, right 59, right 97.  Press confirm when you hit those numbers, and don't turn the dial any other way; if you overshoot, you'll just have to try again.

Boss: Lost Number

This boss can be paralysed by either the Choco/Mog summon or through Aeris' Seal Evil limit break.

- Pick up the Odin Materia and the Key to the Basement after the battle.  Head down to the basement, open the previously locked door and have a chat with Vincent.  He'll join you when you leave.

- Get Vincent: Achievement.

At this point, I headed back to the Mythril Mines and got the following;

- Red XIII's Final Limit: Achievement.
- Vincent's First Limit: Achievement.
- Cait Sith's First Limit: Achievement.
- Cait Sith's Final Limit: Achievement. 

Then to Battle Square at the Gold Saucer to win 8 Battles and gain a pair of Sprint Shoes.  I didn't earn enough battle points for a good prize at this point, since the Champion Belt will be cheaper later.

- Battle Square: Achievement.

Mt Nibel

- You'll see a Rune Blade in the first area, on the path above you.  Just climb up and get it.  There's another section where you can climb up, just before the bridge, and you'll find a Plus Barrette up there.
- Walk past the five pipes in the next area, and climb down the ladder so it unfolds; this will let you backtrack later.
- Slide down pipe #2 for a Powersoul and pipe #3 to pick up an All Materia in the chest.  Ignore the scorpion  at the bottom and head south, jumping off the ledge and into the cave.
- If you run into a Dragon, try to steal Gold Armlets, they're rather better than silver.  The Dragons also use Flamethrower, so you can pick that up if you don't have it already.
- In the cave, run to the back and back down the left side to open the chest containing an Elixir.
- There's an Elemental Materia near the mako fountain on the next screen.
- The chest in the cave contains a Sniper CR weapon.
- Climb the path up and walk past the reactor to get back to the previous area.  Finally, you can climb down and fight the scorpion.

Boss: Materia Keeper

Uses Trine.  Since you have your enemy skill materia on you anyway, ???? works quite well.  This is one of only two opportunities to learn Trine.  If you miss it here, you can learn it for all four enemy skills materia later, with Godo at the Pagoda.

- Pick up the Counter Materia after the battle.

Rocket Town

 - Speak to the man outside the item shop several times to get a Yoshiyuki for Cloud.
- The item shop has two new materia; Barrier and Exit.
- You'll find a Power Source in a chest in the house to the right and a Drill Arm in the northernmost house.  In the backyard, you'll find the Tiny Bronco.
- Immediately after examining the Tiny Bronco head back to Fort Condor for FC Battle 7.
The prize is a Superball. - Finally, come back to Rocket Town and you'll be able to fight Palmer for the airplane.

Boss: Palmer

He has 6000hp; just hit him a few times.

Optional Quests with the Tiny Bronco 

- You can pick up Aeris' Great Gospel limit by heading to the house near Gongaga and trading a piece of Mythril to open the small chest.  You can get more Mythril from the cave near Fort Condor as long as you've fought a number of battles which ends with identical, even, digits.  You can swap the second piece of Mythril to open the other chest, which contains a Gold Armlet.
- Aeris's Final Limit: Achievement. 
- You can take FC Battle 8 now. The prize is 3 turbo-ethers.
- You can get to Bone Village at this point.  It's on the southern end of the Northern continent.  You can buy Rune Armlets there (4 slots, double AP), as well as  Diamond Bangles, which have the best defence so far and have 5 slots.
- Head through Bone Village to the sleeping forest; you can go to the second screen and pick up the Kujata Materia.  It'll flash every so often and you'll have to run and grab it.
- You can head to Wutai at this point.  It's on the western continent.

Wutai

- Yuffie will steal your materia on the way to town.
- In Wutai, you'll find an MP-Absorb Materia in the item shop, near the save point.  Yuffie will steal that, too.
- Head northwest, to the second part of town.  In the large house on the right there's a free sleeping area with a secret tunnel in the lower left corner of the room.  That leads to a chest containing a Hairpin.  There's a similar secret tunnel on the other side of the house which leads to a Magic Shuriken.  Speak to Godo a couple of times and Yuffie will show up again.
- Head back to the house near the entrance, talk to the occupants and examine the screen on the left to find her again.
- Examine the wiggly pot near Turtle's Paradise.
- Finally, follow Yuki downstairs.  Before you enter the room, examine the Turtles Paradise Newsletter #6 outside before following Yuffie inside.
- Head back up to the section with Godo's house and ring the bell on the left.  That'll open up a door in the base of that area.  On the way out, grab the Elixir and Swift Bolt from the chests.
- Head north from the save point, up to Wa Chao.  You'll find a Dragoon Lance in the cave Rude is standing in front of.  Head back outside and south.

Boss: Rapps

Use Barrett's 1/2 Limitbreak, Mindblow, to suck away Rapp's MP and prevent it from using its Aero 3 attack.

- After the battle you'll get your materia back!
- Search the house on the bank opposite the save point - the one full of cats - to find a HP-Absorb Materia upstairs.
- You can pick up your prize from Turtle's Paradise now, if you read the poster outside by the door.  You'll receive a Guard Source, Luck Source, Mind Source, Power Source, Speed Source, Magic Source and Megalixer.  You'll also be able to buy weapons at the Weapon Shop.
- Outside Wutai you can learn Magic Hammer from the Razor Weed on the green plains and Death Force from the Adamantaimai on the beach.  Try manipulate to make this faster.  You can also steal Adaman Bangles, which have a high physical defence, but no magic defence and only two slots.
- You can also the Wutai Pagoda subquest to earn Yuffie's final limit break now, but if you do, you won't be able to complete your fourth Enemy Skill materia.  You can only learn Trine in three places, and Godo is the only one you can put off until after you get the last materia.

Gold Saucer and the Keystone

- Enter Gold Saucer via North Corel and go to Battle Square.  The Keystone is in Dio's museum, and he'll let you have it if Cloud competes in the arena.  Win all eight matches to obtain a Protect Vest and a Choco Feather.

Boss: Battle Square

 If you didn't get it earlier, you should get the achievement now.

I equipped Cloud with the Murasame and an Adaman Bangle. Enemy Skill Materia, Counter Attack, Long Range, Fire linked to Elemental (just in case the last battle was a dragon) and Choco-Mog linked to MP Absorb.  Have him healed, with a limit break ready to go, and in sadness state (use a tranquilizer).

Use Choco/Mog, Beta, Aqualung and Matra Magic against groups, Fire against single enemies.  Use Magic Hammer if your MP gets too low.  The HP Absorb should keep your HP up, especially with the Adaman Bangle on and your defence up in the 90s.  You can heal with White Wind.  You'll need a bit of luck - it took me five attempts - but you should be able to do it.

- After the date event, check the cabinet in the hotel room for an Elixir.
- FC Battle 9 is available now. The prize is 3 turbo-ethers again.


Temple of the Ancients

- The temple is on an island south of Junon.  You can get the Tiny Bronto there by going down the river near Nibelheim then around the island chain.
- After getting the keystone from Tseng put it on the alter, and you'll find yourself in a labyrinth.  Take the stairs and then the vines down.  Run under the steps to the visible chest, which contains a trident.
- From the chest, go down the steps to the right, then climb the vines up.  Try to walk through the doorway.  It's blocked so go left up the stairs and then up the vines.  You'll be following the little wizard, and you'll pick up a mind source at the top of the vines.
- Follow the wizard into the room down the steps from the mind source.  You can pick up a Silver Rifle in the chest, as well as buy items, heal yourself, and save your game with the little wizard.
- Head back outside and down the vines you just climbed up.  Go through the doorway at the bottom to grab a Turbo Ether.
- Head down all the stairs to the bottom left of the screen.  Climb down the short vines to open a chest containing a rocket punch.
- From here, climb the vines up.  Ignore the ancient wizard and go the other way, under the doorway to the north.  Go right down the stairs, then climb the vines up the Luck Plus Materia.
- Now follow the other Ancient.  Dodge the boulders in the room you end up in - you'll need to be in a position where Cloud ends up in the 'u' shaped gap - and grab the Morph Materia along the way.
- In the clock room, you can pick up the following items; 4 Princess Guard, 5 Ribbon, 7 Trumpet Shell, 8 Megalixer.  If you let the second hand knock you off the clockface, you'll fall down to a fight and a chest containing a nail bat.
- To continue, go through door 6.
- The little wizard will go through the door at the top left first.  To catch him, jump down one level and head through the second door from the right.  Otherwise, watch the doors he goes through and where he comes out and try to run into the door he'll be coming out of.
- Jump down and open the chest in the lower left to find a Work Glove.  Finally, go through the bottom right door to come out at the top.  The door in the centre will be open as soon as you've caught the little wizard guy.
- You'll have time to equip your party between little talky scenes.

Boss: Red Dragon

Strong against fire, weak against water.  Try Aqualung.

- Unequip Aeris at this point.   You'll have any materia or accessories returned to you, so it's really just the armlet and weapon you need to consider.

Boss: Demon Gate

Try using Right Hands, Deathblow - use Vincent and the Sniper CR to avoid missing - and the ???? Enemy Skill once the boss has done enough damage.
- After waking up in Gongaga, you can head to Fort Condor for FC Battle10. The prize is 5 x-potions.
- Head back to Bone Village.

Bone Village

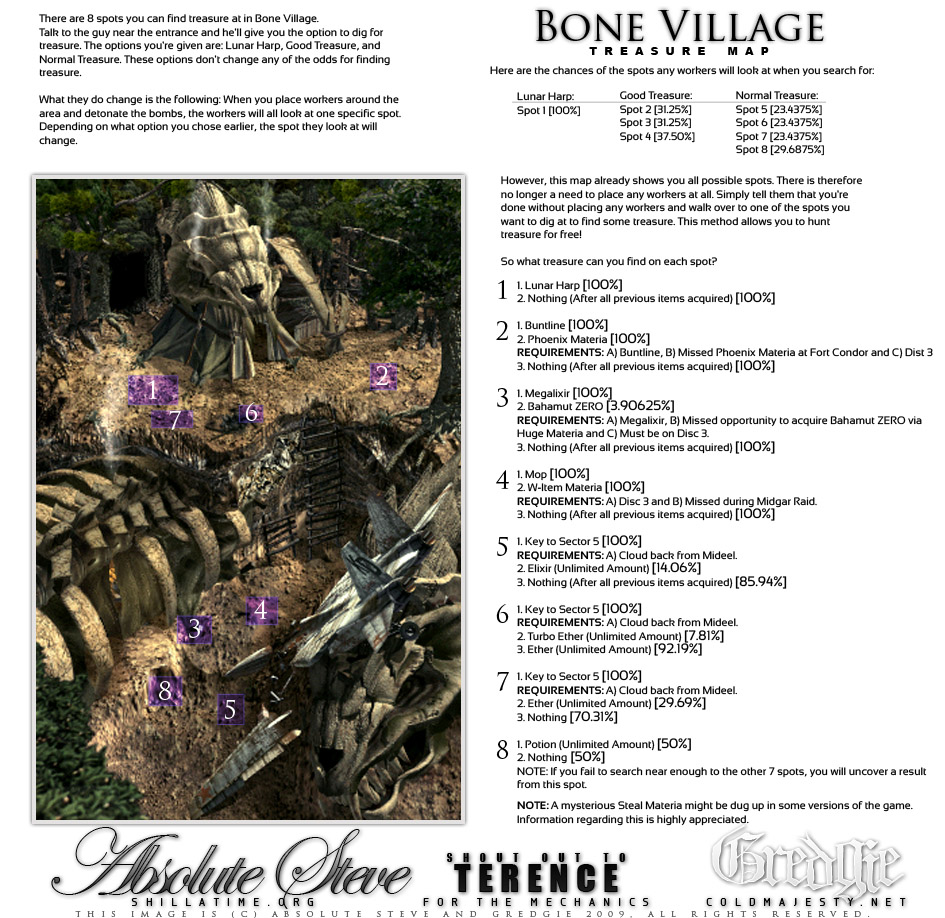
- You can look for items now.  I found Absolute Steve's map very helpful here.  You can pick up the Lunar Item, the Megalixer, the Mop for Cid and the Buntline weapon for Vincent right now.  You can also pick up endless free elixirs at point 5, which might be useful if you're going for the Battle Square prizes.
- Once you've unlocked the Ancient Forest with the harp, you can go to Fort Condor for FC Battle 11 and five x-potions.
- Continue through the forest.  On the screen with the tree trunk, you can reach the chest containing a water ring by going under it.
- At the threeway split in the road, go left first.  You'll find a save point and a magic source in the house on the left and an Aurora Armlet in the arena to the right.
- Go back to the spit and take the right turn.  You'll find a Guard Source, an Elixir and an Enemy Skills Materia in this section.
- After reading, you can head back for FC Battle 12.  You'll get another five x-potions.
- Head back to the intersection and go north.  You'll find a Comet Materia in the building, at the top of the stairs.  After fetching it, head all the way down.  Save your game and equip someone with the Water Ring.

Boss: Jenova * Life

Mainly uses water attacks.  You can learn Aqualung on your new Enemy Skill Materia.

- End of Part 1: Achievement. 

Thursday, 25 December 2014

Final Fantasty VII - Limit Breaks

Limit Breaks

Each character in FF7 has up to seven limit breaks; three levels with two at each level, and one final limit break at level 4.


You unlock new levels by having that character defeat enemies (ie, deal the final blow), and unlock the second limit break at each level by having them use the first one.  The final limit break requires a specific item for each character in order to unlock it, and characters begin with their first limit break unlocked.

To unlock the first three levels of limits;


Name1/12/11/22/21/32/3
CloudBraverCross-Slash
(Braver x 8)
Blade Beam
(120 kills)
Climhazzard
(Blade Beam x 7)
Meteorain
(200 kills)
Finishing Touch
(Meteorain x 6)
BarretBig ShotMind Blow
(Big Shot x 9)
Grenade Bomb
(80 kills)
Hammerblow
(Grenade Bomb x 8)
Satellite Beam
(80 kills)
Ungermax
(Satellite Beam x 6)
TifaBeat RushSomersault
(Beat Rush x 9)
Water Kick
(96 kills)
Meteodrive
(Water Kick x 7)
Dolphin Blow
(96 kills)
Meteor Strike
(Dolphin Blow x 6)
AerisHealing WindSeal Evil
(Healing Wind x 8)
Breath of the Earth
(80 kills)
Fury Brand
(Breath of the Earth x 6)
Planet Protector (80 kills)Pulse of Life
(Planet Protector x 5)
Red XIIISled FangLunatic High
(Sled Fang x 8)
Blood Fang (72 kills)Stardust Ray
(Blood Fang x 7)
Howling Moon
(72 kills)
Earth Rave
(Howling Moon x 6)
Cait SithDiceNASlots
(40 kills)
NANANA
CidBoost JumpDynamite
(Boost Jump x 7)
Hyper Jump
(60 kills)
Dragon
(Hyper Jump x 6)
Dragon Dive
(76 kills)
Big Brawl
(Dragon Dive x 5)
YuffieGreased LighteningClear Tranquil
(Greased Lightening x 8)
Landscaper
(64 kills)
Bloodfest
(Landscaper x 7)
Gauntlet
(64 kills)
Doom of the Living
(Gauntlet x 6)
VincentGaliant BeastNADeath Gigas
(40 kills)
NAHellmasker
(56 kills)
NA

And for the level 4 limits;
  • Cloud
  • Barret
  • Tifa
  • Aeris
  • Red XIII
    • Defeat Lost Number in Shinra Mansion.  Open the safe using right 36, left 10, right 59, right 97.  It's weak against paralysis so try Seal Evil or Choco/Mog.
  • Cait Sith
  • Cid
  • Yuffie
  • Vincent

Sunday, 31 August 2014

Persona 4 - Quests

Here's a list of the quests in date order.  I typically copy them into a sticky-note per playthrough and move a space down the list as the days pass, so I know which quests I can currently be working on.

Use this page for specific information on how to do each quest.

18/4 - Quest 23
25/4 - Quest 3
1/5 - Quest 5
2/5 - Quest 4
2/5 - Quest 2
2/5 - Quest 1
18/5 - Quest 10
18/5 - Quest 7
23/5 - Quest 8
3/6 - Quest 49
3/6 - Quest 25
3/6 - Quest 14
5/6 - Quest 11
5/6 - Quest 9
7/6 - Quest 15
7/6 - Quest 12
9/6 - Quest 16
9/6 - Quest 17
30/6 - Quest 19
3/7 - Quest 22
12/7 - Quest 21
13/7 - Quest 18
9/8 - Quest 27
22/8 - Quest 28
22/8 - Quest 24
2/9 - Quest 47
5/9 - Quest 29
20/9 - Quest 31
26/9 - Quest 34
1/10 - Quest 35
8/10 - Quest 39
8/10 - Quest 37
8/10 - Quest 32
9/10 - Quest 38
9/10 - Quest 33
31/10 - Quest 40
12/11 - Quest 50
22/11 - Quest 43
22/11 - Quest 44
22/11 - Quest 45
22/11 - Quest 46

Hermit

Quest 6
Quest 13
Quest 20
Quest 26
Quest 30
Quest 36
Quest 41
Quest 42
Quest 48

Wednesday, 20 August 2014

Persona 4: Defeating Shadow Kanji, Nice Guy, and Tough Guy

Yeah, I'm taking a break from Vandal Hearts II for a moment.

For this battle, you have a party of Yukiko, Chie, Yosuke and the protagonist (I call him August).

I fused a Rakshasa for this battle; it's strong against physical attacks, but not weak against lightening.  I lucked out and gave it Media; ideally, I'd have liked for it to have some sort of third level attack skill for greater damage, but no luck there.

Your first priority is to take out Nice Guy.  I had Yosuke use Magaru, to damage all three, while Yukiko used Agilao on Nice Guy alone, since he's weak against fire.  He absorbs Ice, which Tough Guy is weak against, while Tough Guy absorbs Fire.  Chie used physical attacks while August either attacked Nice Guy or used Media.

Once Nice Guy is down, Chie can start using Mabufu.  Yosukue keeps using Magaru, while August and Yukiko are on healing duty or attacking Shadow Kanji.  Tough Guy absorbs physical attacks, so no point using those.

Once both helpers are down, pile on Shadow Kanji.  Elemental skills tend to do more damage than physical attacks.  Guard if he uses Power Charge.  Otherwise, it's a straightforward slugfest.  It's easier to use August to heal, since I found Yukiko's Agilao to be the best damage skill I had.  Yukiko and Yosuke both died once, but luckily, Yukiko can use Recarm now, so I only needed one Revival Bead.  My party was around level 26, which made the whole battle much easier.

Saturday, 12 July 2014

Vandal Hearts II Guide: Chapter II

Killea Bog
00,22 - Naigama
08,23 - X-boom
09,06 - Map-A
09,13 - Magibook
11,18 - Map-4

It's fairly easy to take out all but the healing mage, then send your treasure hunter flying around to get all the treasures.  Give the magibook to whichever one of your mages didn't take the other one.

Fortuna
02,37 - Dirtball
14,37 - Urn

The dirtball is an important piece of the good ending, and it's only available at night.  Make sure the little clock in the top right on the worldmap is pointing between 10pm-12am.

Put your mages right up front, near the bridge.  That'll give them just enough reach to damage the first group of four when they move in, especially if you put the one with both a magibook and philbook on the right, or give the other a little extra movement with the runners. 

Have Maria and Pike take out the group on the wall with orbs, and then just go on from there.

Polata Ruins
08,15 - Angelrod
00,00 - C-heels
12,00 - E-punch
18,00 - G-coater

Send your fliers down to support Joshua early on.  You can also use blockmake, rather than going down the stairs at the side.  You can also use blockmake to trap one or two enemies on top of the wall, and leave them there while you hunt for treasure.

At this point, you can reach earlier maps in the game to pick up some additional treasure.

Danjou Forest
00,14 - Novacula

For this one, it's easier to give your treasure hunter the blockmake ability, rather than a shield.  Kill off all but one enemy, then tease them while your treasure hunter makes his way up the tree.  I found it easiest to put everyone back over the bridge, behind a barrier of guys with shields loaded up with recovermarks.   It takes a while to build a staircase of blocks.

Yuta Plain (W)
15,09 - Boots

Put the boots on your treasure hunter, and it'll all get slightly easier.

Dybosa Ridge
01,03 - Beacon
18,07 - Hint-7
30,03 - W-cape
 14,17 - Pickax
17,16 - Stoneye


I found it easiest to have my treasure hunter pick-up the three hidden items along the bottom of the hill while the rest of the party made their way up the middle, carefully dodging arrows.  I left one of the mages alive (drained of MP) while the treasure hunter picked up the chests.

Aposs Port

20,31 - Tower
22,30 - F-socks
20,21 - G-cap
22,00 - Tower

You can send the rest of the party off to deal with the various groups while your treasure hunter goes after the Tower and the F-socks.  When you get down to Mohosa, you can use two blocks to trap him on his island, then pelt him with magic at your leisure.  Or send your fliers in.

Tehapi Dunes

There's no treasure here initially.  Come back after fighting the Sand Worm.

10,17 - Map-6
13,20 - Bugeyes
18,12 - L-vase
23,15 - Zebra

The Zebra shield has the Reanimator skill, which is the first time in the game that you can revive characters who die.  It's still game-over if Joshua dies.

The Rock
11,15 - Puggio
29,16 - Iron-fan

Lots of mages here, but you can generally dodge one attack then pound them with your own magic.

Liuki Checkpoint
04,03 - Puggio
05,04 - Philbook
07,08 - Urn
05,16 - L-slab
06,16 - Hint-8
15,23 - Ancient

Go up the left side, and send your treasure hunter and his assistant up to get the three treasures right in front of you.   I had them take out the mage and one of the fliers, while the other went after the main group.  Try to make the mages move before you attack the group on the side because they can both heal.

Yuggor Station
00,28 - Ringrod
07,28 - Runners
13,17 - Shades
14,15 - Tower

You'll need blockbreak to get near the chest containing the Tower.  After this battle, you can buy re-animator orbs.  Expensive but worth it.

East Railroad
02,32 - Bullion

It's pretty easy to get the bullion, and equally easy to get Manon to use up her MP.  You'll want all of your guys to move in at once, because she has recovermarks.

Gabhul Castle
02,17 - Ancient
15,17 - Saviorod

The items are in chests, so hard to miss.

Gabhul Castle (2)
01,22 - Bugeyes
14,22 - W-cape
07,00 - Hint-9

Friday, 4 July 2014

Long Live the Queen - a Few Achievements

This playthrough will get you the following achievements;

  • Long Live the Queen
  • Discovered a Terrible Family Secret
  • Cause a Couple to Divorce
  • Angel of Music
  • You Do if I Say You Do
...and the following epilogues;

  • Refuse lumen
  • Marriage
  • Evil lumens
  • Angel
  • Printing press
  • Hospital
  • Queen
This is a useful resource for other achievements, epilogues, and a few deaths.

Week 1

Studied Trade in the morning.
Studied Production in the afternoon.
Walk in the garden.

Week 2

(Studied Court Manners in the morning.)
(Studied Trade in the afternoon.)
Arrest her
Attend Court Sessions

Week 3

Studied Production in the morning.
Studied Trade in the afternoon.
Play with Toys

Week 4

Studied Elegance in the morning.
Studied Elegance in the afternoon.
Sneak out

Week 5

Studied Foreign Affairs in the morning.
Studied Foreign Affairs in the afternoon.
Don't wear it
Sneak Out

Week 6

Studied Herbs in the morning.
Studied Battlefield Medicine in the afternoon.
I won't free her
Walk in the garden.

Week 7

Studied Herbs in the morning.
Studied Battlefield Medicine in the afternoon.
Give her title to Ignatius
Attend Court.

Week 8

Studied Court Manners in the morning.
Studied Court Manners in the afternoon.
Invest
Attend Court.

Week 9

Studied Internal Affairs in the morning.
Studied Internal Affairs in the afternoon.
Sneak Out.

Week 10

Studied Internal Affairs in the morning.
Studied Internal Affairs in the afternoon.
Offer to punish the Duchess of Hellas
Command her to marry an Ixionite
Attend Services.

Week 11

Studied Public Speaking in the morning.
Studied Public Speaking in the afternoon.
Walk in the gardens.

Week 12

Studied Flattery in the morning.
Studied Flattery in the afternoon.
Invest
Attend court.
Put on the conversation outfit.

Week 13

Studied Court Manners in the morning.
Studied Court Manners in the afternoon.
Ask the Earl of Io about her story
Sneak out.

Week 14

Studied Public Speaking in the morning.
Studied Ciphering in the afternoon.
Attend court.


Week 15

Studied Composure in the morning.
Studied Composure in the afternoon.
Religious doctrine
Attend court.

Week 16

Studied Presence in the morning.
Studied Presence in the afternoon.
I will parade and make a speech
Attend services.
Put on the royal_demeanour outfit.

Week 17

Studied Composure in the morning.
Studied Ciphering in the afternoon.
Banion, Duke of Maree
Accept
I plan to marry you.
Attend services.

Week 18

Studied Flattery in the morning.
Studied Flattery in the afternoon.
Display it
Greet her politely
Assassins
More guards

Play with toys.

Week 19

Studied Lore in the morning.
Studied Lore in the afternoon.
Keep them the same
Sneak out.

Week 20

Studied Meditation in the morning.
Studied Meditation in the afternoon.
Pardon him
Attend court.

Week 21

Studied Divination in the morning.
Studied Divination in the afternoon.
That's hilarious!
Ignore it
Attend court.

Week 22

Studied Lore in the morning.
Studied Lore in the afternoon.
Send him to your uncle
Speak to father.

Week 23

Studied Ciphering in the morning.
Studied Ciphering in the afternoon.
Reject her
Sneak out.

Week 24

Studied Decoration in the morning.
Studied Decoration in the afternoon.
Sneak out.

Week 25

Studied Instrument in the morning.
Studied Instrument in the afternoon.
Attend court.

Week 26

Studied Voice in the morning.
Studied Voice in the afternoon.
Sneak out.
Put on the art outfit.

Week 27

Studied Voice in the morning.
Studied Voice in the afternoon.
Go to Sudbury for Gwenelle's party
Attend court.

Week 28

Studied Instrument in the morning.
Studied Voice in the afternoon.
Flatter them both
Offer to help
Sneak out.
 
Week 29

Studied Court Manners in the morning.
Studied Production in the afternoon.
 Ask about Briony's parents
Play with toys.

Week 30

Studied Presence in the morning.
Studied Instrument in the afternoon.
Attend court.

Week 31

Studied Presence in the morning.
Studied Instrument in the afternoon.
Sneak out.

Week 32

Studied Foreign Intelligence in the morning.
Studied Voice in the afternoon.
Employment
Save it for later
Walk in the garden.

Week 33

Studied Foreign Intelligence in the morning.
Studied Foreign Intelligence in the afternoon.
Music
Attend court.
Put on the intrigue outfit.

Week 34

Studied Foreign Intelligence in the morning.
Studied Foreign Intelligence in the afternoon.
Recruit soldiers
Stay in the capital
Attend court.

Week 35

Studied Foreign Intelligence in the morning.
Studied Foreign Intelligence in the afternoon.
You have nothing more to learn about Foreign Intelligence.
Sneak out.

Week 36

Studied Public Speaking in the morning.
Studied Presence in the afternoon.
Sing to him
Attend court.

Note: what you do after this point makes very little difference.

Week 37

Studied World History in the morning.
Studied World History in the afternoon.
Sneak out.

Week 38

Studied Novan History in the morning.
Studied Foreign Affairs in the afternoon.
An extravagant feast
Sneak out.

Week 39

Studied Novan History in the morning.
Studied Novan History in the afternoon.
Visit tomb.

Week 40

Studied Novan History in the morning.
Studied Novan History in the afternoon.


Sunday, 22 June 2014

Vandal Hearts II Guide: Chapter 1

Set-Up

From here on, I found it easier to have a designated character for each type of weapon.  I generally set it up like this;


James: Sword, shields, L-Armour.
Vlad: Axes, Lances, shields, A-Armour.
Lira: Ballistics, ie, Bows/Throwing Weapons, L-Armour.

Prateau, Mage: Staff, shield, R-Armour.
Gilti, Mage: Staff, shield, R-Armour

Pike, Treasure Hunter: Knives, shields, S-Armour.  Should always have the Unlock and Searchmark skills available.
Maria, Treasure Hunting Support: Special Weapons, S-Armour.  Give Blockmake, Blockbreak, and Terraform as they become available.


Battles

Railroad

4,53 - Halbert

You start this battle without a chance to change your equipment.  Vlad has Clive's stuff, and Pike has Yuri's.

You can ignore the Halbert for now - you'll have to come back once you've gotten some flying armour, anyway.

Visit the shop only, re-equip your characters and head back to the Railroad.

Railroad
4,35 - H-Ring

The Halberd is still here if you haven't gotten it before.  Use this battle to learn new weapon skills.

Luxar Village
04,24 - Cutlass
07,13 - V-cape
15,17 - Bandana
16,24 - Graver

This battle will begin as soon as you enter and exit the tavern.

After this battle, stock up on weapons.  There are also two goblin shields, which you should buy.  Sell the Bullion.

Bahtar Plain
01,12 - Shades
01,28 - Urn
09,29 - Ballast
11,13 - Hint-5

Go after one group at a time.  Be careful when sending your treasure-hunter out by themselves.  I suggest that you work along the side left of where your characters start, where most of the treasures are.

It's easier to go after Godeau with only one character at first.  He'll move first, and if you know who he's going to target, it's pretty easy to dodge until his mp runs out.

Fort Gusta
Return later for treasure.
15,02 - S-coater
15,02 - Runners
15,12 - [I]-ring

If Maria stands on 15,25, the enemies can't get high enough to attack her or Gilti, but they can both rain arrows and thunderbolts down.

The Runners are hidden under the chest with the S-Coater.  Open the chest first, then stand on the spot where it was.

There are a couple of new weapons for sale in Luxar after this battle.  In the Tavern, speak to the man, who mentions Triangle.  Go to the shop, scroll down below 'items', and click on '???' until he sells you Map-3.

Triangle
03,03- Goblin
03,03 - Clump
10,08 - Pipe

If you come here now, you'll only face four enemies.  The clump is hidden underneath the chest with the Goblin Shield, and it's an important piece of the best ending.

Kumenu Canyon
18,08 - Goblin
33,01 - Hint-6
33,08 - L-vase

Use the select button to see where your enemies are able to reach, and dodge the archer and mage.  If you're lucky, the enemy mage will move into attack range and you can take him out early. 

Use your two teams to carefully take out the guys near them while moving together.  That should leave you with only the archer and Thorpe herself to deal with.  Send your treasure hunter over to grab the Goblin at this point, while your team takes out the archer and sends someone to tease Thorpe into using up her MP.

Porta River
01,01 - L-glove
14,17 - Magibook
14,29 - Nailbat

The nice thing about this battle is, you can kill all the enemies and then collect the treasure at your leisure, as long as you keep someone on the wrong side of the bridge.  Give the Magibook to one of your mages, it's a great accessory.

Ghote Plain
01,01 - Balloon

You can get an extra Recovermark here if you prepare properly.  Equip a character with nothing but a Shield with Weapon Trade, and have them swap with Yuri at some point.  You can steal your other allies weapons in a similar way, but those skills are easy to get so I don't usually bother.

This is an easy one.  You can grab the balloon on the first turn, and Yuri and his friends are fully capable of raining down hell on the foot soldiers near them.

Barm Mountain Range
05,14 - Pickaxe
23,08 - Maracas

You can steal Yuri's items in this battle, if you prefer.

With the Pickaxe and Maracas equipped, head back to Fort Gusta.

Fort Gusta
06, 27 - Joule

Use the blockmake ability to help your treasure hunter climb on top of the big post.  The Joule has the 're-move' skill, which lets another character move twice.  This can be useful.

Mine Level 1
09,07 - V-cape
09,13 - Philbook
13,20 - Map-11
15,20 - T-ring

Bring a couple of c-potions along.

Split your team at first; your two mages can take out the two bugs coming up along the [x,0] edge, while your physical attackers can take care of the two on the [23,X] flank.  Your two flyers can take out one of the nearby bugs below you immediately.

Blockmake is essential for getting half of the treasures here, and it'll make getting down off the ledge easier too.

JackBlade
01,38 - Pole-ax
30,38 - Goblin

Make life easier, and move everyone up near the top of the map.

Mine Level 2
21,00 -  Hi-Herb

One of the simpler levels.

Mine Level 3
03,08 - Hi-herb

Mine Level 4
00,24 - B-insect
14,24 - Goblin

This battle becomes easier if you use blockmake to create a path straight up the middle, rather than going down the sides.  As long as you're careful to dodge the mages, you should be fine.  And you get a lovely new Recovermark!

Chamber
07,07 - C-potion

My dilemma here was whether to have Lyra learn the bow or the ballistic.  I went with the bow.  You won't need 'blockmake', so you can always have Maria use the ballistic if you're in the same situation.

After taking out the foot soldiers, use flyers and mages to take out the bosses.  It's much easier trying to dodge with a few people than all of them.

Saturday, 14 June 2014

Vandal Hearts II Guide: Prologue

In order to get the best ending, you will need to obtain at least one of every weapon in the game so this guide will include that goal.  I aim to master each of these, so I can move the skills around and sell the empty ones.

The percentage shown on the save screen is the percentage of weapons you've found.  2-Handed is 1% while 1-handed is equal to 0.5%.

Set-Up

I generally leave the characters with the type of armour they started with - Clive with A, Joshua with L, and Yuri with R. 

Battles

Tutorial

No Treasure.


Polata Village

Buy a Bowie Knife and an Antennae, and equip them both on the same character.  Otherwise, buy whatever mixture of weapons and armour you like, and equip them on whoever you like.  You goal is to eventually buy all of them. 

Rosace Hill
22,22 - Hint 1

Defeat the three enemies, and send your little guy with the antennae to stand on 22,22.  Have him attack empty squares if he hasn't learned the Searchmark tech by then.

Mastha Canyon
20,10 - Hint 2
01,00 - Mallet


Transfer your learned skills onto the highest weapon of that level, and sell them to buy a few different weapons.  Again, equip these on anyone you can, but make sure someone has the unlock skill.

Kill all but one enemy, and then go for the chests (use 'unlock' to unlock them).  The trick is to tease the enemy; if only one character is in range, they'll go for that one.  Just make sure you don't get too close to the rest of the group.

Return to Polata, buy new weapons, and deliver the Muherb to Dr Bonner.

Yuta Plain (w)
00,11 - Hint 3
15, 23 - B-Light
Return for Extra Treasure in Chapter 2


Yuta (E)
03,14 - Hint 4
04,05 - Goblin Shield
14,21 - Goblin Shield

You are going to want to grab as many Goblin Shields as you physically can, because they carry Recovermarks, which restore 15hp per turn, and stack to heal more.  There's only one point in the game where they're sold, and the rest you have to find.

Danjou Forest
00,23 - Pinwheel 
Return for Extra Treasure in Chapter 2

You'll need to go up the stairs to get to the pinwheel in the treasure chest.  There's more treasure here, but you'll need the blockmaking skill to grab it.

Go to the Hideout.

Kutao Mt.
06,11 - Urn
11,11 - Map-12 

The two treasures here are very close together, so you won't need to waste much time.  Map-12 opens a bonus area.

Queentia (Map-12)
04,05 - Hi-herb
04,09 - Hi-herb
09,08 - Graver
10,04 - Hi-herb
12,13 - Rebelrod
15,08 - Hi-herb
17,04 - Hi-Herb

All of the treasures are in chests.  If you come here now you'll only face two enemies.

Byron Manor (Sewers)
13,16 - Bullion
14,28 - Cutlass
15,05 - Halbert

This map is non-repeatable, so grab the treasures now.  Particularly the Bullion.  Consider bringing along some c-potions, too.

If you choose to go back, you'll get a chance to change your equipment and visit the shop again, though there isn't anything new.  There are two battles in a row after this point.

Byron Manor (Dining Room)
04,09 - Herb

This map is also non-repeatable.

Sunday, 8 June 2014

Shadow Hearts: Covenant - Great Gama and the Man Festival

To upgrade Joachim's abilities, you'll need to face his teacher, Great Gama, three times.  You will also need to complete the Man Festival.

Muscle Arts

  • Drain Touch: automatic.
  • Grand Slam: face Great Gama the first time you visit Southampton.
  • Deathtron Hammer: face Great Gama in Southampton before heading to Apoina Tower again.
  • Artem Buster: face Great Gama in Nihonibashi.
Man Festival

You can tackle the Man Festival in Nihonibashi, after visiting the Azuka Stone Platform and gaining all of the Muscle Arts.  Speak to the Great Gama to begin.

Essentially, you're fighting through multiple battles.  You can save after every ten.  I found Mind's Eyes on Joachim, Yuri and Kurando helpful, and you'll want to bring Anastasia along when you can to take pictures.

The battles are easy.  For the last few, as long as you protect specific characters against specific status effects, you'll be fine.  Here's what you'll need.

  • Kurando: Pocket Watch.
  • Gepetto: Shell Bracelet.
  • Lucia: Pocket Watch.
  • Karin: Anne's Cross.
  • Blanca: Will Power.
  • Anastasia: Leonardo's Bear.

Saturday, 7 June 2014

Shadow Hearts: Covenant - Anastasia's Albums & Silver Eggs

You need to collect five Silver Angels in order to trade them for Anastasia's best weapon.  You'll find them in the following locations.

  • On the roof of the Hermitage after fighting Veronica.
  • Behind the rack of vegetables in Inugami Village,
  • In the Doll House, in the room at the end of the first floor corridor.
  • Prize in the Solomon Trials: Worshipful 1.
  • Complete the Wrestler's Quiz in Nihonibashi park.

To gain these Albums, have Anastasia use Snapshot on the enemies listed.

SkillEffectEnemyLocation
Aqua RaiseWater Damage and PoisonPendulumPetrograd
Solomon Trials: Monk 1, Monk 3
Direct PressReduce enemy HP by 50%HatiIdar Flamme
Solomon Trials: Believer 2, Believer 3
Cash StealSteal CashAndreSolomon Trials: Monk 3, Believer 4
RemoveRemove positive Status effectsOscarSolomon Trials: Monk 4, Believer 4
Pillage StormSteal ItemMini TanukisSolomon Trials: Believer 4
Falling LeavesAllows quick escapeTenguForest of Wind (wear a warning device)
Power CannonSpecial damage, 17 hits, linear.Mecha LordAzabu Kamiyashiki
Solomon Trials: Embodiment 2
Spirit WardPermanently remove enemy from battle.King TamakosQueen's Garden
Solomon Trials: Embodiment 2
NightmareReduce Enemy HP to 1.BaileyDoll House
EuthanasiaLarge circular Water damage and status effect.OrobasNeam Ruins, Bonus Area

Saturday, 31 May 2014

Shadow Hearts: Covenant - Spoiler-Free Item Guide Part 6, Sidequests to Final Battle

Ring Soul
Character Abilities/Ultimate Weapons or Armour
Lottery Members
Crests 
Sidequest 


Cannes

- Lenny 1: speak to the children at the beach.

Petrograd

- Lenny 2: speak to the old lady near the bridge.
- Prayer Robe (Anastasia's Ultimate Armour): speak to the queen in the Hermitage, in the room behind the throne room.

Domremy

- Charm Pouch (Blanca's Ultimate Weapon): return to the church.


Champs Elysees

- Lenny 3: speak to Nupach.


Paris Cathedral

- Nemesis Fan (Lucia's Ultimate Weapon): trade the Research Paper to Malkovich.  This is the best ending for the Straw Millionaire quest.  If you ended the quest another way, you can buy the fan from the shop here.


Cannes

- Lenny 4: speak to Cesare on the stairs.

Wine Cellar


Decarabia: Play third and final Lucky Chests game.


Le Havre

Unlock Black Forest: speak to Gauss in the shop. 

Black Forest

- Pure Extract: near save point.
- The Chariot: chest shortly after second white flower.
- Slow 4: on the right side.  You're supposed to take the middle turning here, so be careful not to miss the chest.

- Seventh Key: return after the boss battle.  Take the first right fork, and it's hidden along the side of the second right.
- Seven Stars: search the centre of the junction where you found the Seventh Key.

Florence

- Microskirt (Karin's best armour): speak to Healthy Rooney, and she'll hand it over if you've hit 10,000 steps.
- Unlock Tiffauges Castle: speak to Backstreet Nero.


Southampton

- Bride's Dress: Return to speak to Carla in Florence, then speak to Laurence on the wall.

Tiffauges Castle 

- Ronove: in the corridor shortly before you run into Bread.
- Petrify 3: Room north of Bread.
- The Devil: Keep heading north.  It's in a chest to the northwest, after you pass Maivia.
- Lottery 4: Go through the mirror near Maivia, and Alicia is to the northeast.
- Daphne Fruit: go through the mirror south of Alicia, and it's near the locked door further south.

- Crucifix:Go through the mirror near the locked door, and keep going south and it's in the 4-way room which mirrors where Bread was standing.
- Seal of the Urn: south of the Crucifix.
- Wolf Bout 13: go through the mirror to the east of the Crucifix, and make your way to the southern room.
- Neo-Amon: To get to the boss battle, go north from the wolf.  After passing through the locked door, go through the mirror to the west again, and go north.

Neam Ruins

Speak to Roger Bacon to unlock.  Go down through the bit of the ruins you've covered before, until you come to a new area.

- Seal of Wisdom: travel down using the purple block, then make your way to the northwest corner.  Use the purple block east of the chest to go up.
- Thera Extract: on the small ledge after that purple block.
- Delay 4: on the small ledge after that purple block.

Go back down, and travel up on the block furthest south.  Flip the switch and go down again.  You want to travel up on the block roughly in the middle of the area.  You'll know it's the right one if you end up in a row of gold, blue, and your purple block.  Move forward, using the only blocks available, until you go down twice.

- Strike Expand: near the last purple block you took down.

- Shanghai Heaven: hidden in the alcove northwest of that block.

Go southeast and press the switch.  Go up using the block in the southwest, then again with the block up here.  Hit the purple switch and then the green switch, then go all the way back down.  Head up using the block to the north.  Keep moving forwards until you can hit an orange switch, then go all the way back to the two purple blocks.  Take the southern one again.  Press the green and purple switches, then come back down.

Take the purple block near the Seal of Speed up.  Press the green switch and go back down.  Return to the southwest corner and take the lower block.  Press the purple and green switches again, then go back down.  Take the upper block, and follow the path to a chest.

- Eternal Key

Use the lower block and hit the switches again.

- Pure Extract: northeastern corner of this floor.
- Seal of Speed: west of the pure extract.

Take the block near the seal of speed.  Go up again, ignoring the green switch.


- Seventh Key
- Hieroglyphics: take the block near the chest, then take the next purple block to the north.  Ride it down to the chest.  

Press the switch before riding back up.  Take the block to the right.  Ride the blocks around until they go back down.

- Daphne Fruit: west corner of this area.
- Bat's Gold: take the purple block south of the Daphne Fruit, and it's on the next floor.
- Zodiac Bracelet: take the red block and it's in the room with the save point.

- White Underpants: speak to Roger.
- Chimera Claw (Yuri's ultimate weapon): Leave, then return and speak to Roger again. 
- Dating Outfit: Speak to Roger after completing the Trade Quest and the bonus Neam dungeon.


St Marguerite Island - Fort of Regrets

- Engagement Ring: grab it from Serge in the top right of the first level.  You'll find Irene near the shop.
- Lottery 3: Ludwig, to the west of the second level.  You'll need to play three times.
- Ogress Mask: get from Kazuna in the northwest corner of the second level.  Give it to the Japanophile near the Paris Cathedral.
- Broken Watch: obtain from the sailor in the northeast corner of the second level, show it to a man in the Foreigner's Cemetery.
- Nautilus: peak to the Professor, then go back and forth between him and the other Professor on Cannes beach.  You'll need the Hieroglyphics from Neam.
- Durandal: on the fourth level.
- Biker Jacket (Yuri's Ultimate Armour): head to the place where you fought Lenny.

Mukyo-An

- Lottery 2: in the garden.

Le Havre

- Lottery 1: outside the shop. 

Forest of Wind

- Wolf Bout 14: in the middle of the path.
- Falling Leaves: snapshot Tengu - wear a warning device to ensure they don't escape. 

Montmarte

Wolf Bout 15: automatic. 


Yokohama Streets

Unlock Doll House: Speak to Mizuta near the save point.
Steel Egg: speak to the man at the far eastern edge of the streets.

Doll House

- Thera Extract: right side of the path to the door.
- Nightmare Album: take a snapshot of Bailey.
- Lottery Ticket: near the fireplace in the northern room on the ground floor.
- Petrify 4: in the corridor on the first floor.
- Crucifix: in a room off the first floor corridor.
- Silver Angel: room at the end of the first floor corridor.


Inugami Village

- Unlock the Dog Shrine: speak to Saki in her living room. 

Dog Shrine 

- REI Stone: First room to the west.
- Talisman of Mercy: chest in the room furthest west.
- Poison 4: chest in the room furthest west.
- Strongoids: chest in the room furthest west.

Go back to the entrance, removing the map stones on the way.  Make a path going straight north.

- JIN Stone: chest in the first northern room.
- ZAI Stone: chest in the second northern room.
- Seal of the Urn: chest in the second northern room.

Head back, picking up the stones on the way. 

- Ultra Belt: eastern room.
- Zen Stone: chest in the furthest north-east room.
- Mana Extract: chest in the furthest north-east room.

Go back to the save point.


- Mumeiro (Kurando's Ultimate Weapon): from the beginning, use the north-south piece and the zen stone to create a path which ends directly in the middle of the 3x3 grid.
- Jutendouji (Kurando's final Fusion): after speaking to Saki, leave the village and return.  You'll gain it automatically after the battle.
- Autumn Kimono: after the battle, speak to Saki at her home.

Goreme Valley

- Complete the Solomon Trials.


Nihonibashi

- Mr Wrestler: speak to Yamaguchi in the western park.
- Silver Angel: speak to Yamaguchi again and complete the wrestling quiz. 
- Blue Virgin: speak to Pierre, now you have all the stud cards and all the other dresses.
- Great Question: complete the Man Festival.

Petrograd

- Gold Angel: speak to Edgar, now that you have all the Silver Angels.  

Azuka Stone Platform

Time to finish this.

- Spiderweb: to the northwest of the red circle, level 1.
- Seal of Strength: level 2.  Go forward a bit from where you start and take the right path.

- Dancer's Stars (Lucia's Best Armour): Level 2, eastern side of the map, just past the green warp.

Turn the thing so green is at the front.

- Pure Extract: Level 2, just beyond the red warp point.
- Ultra Belt: on the 3rd level, to the east of the red warp you came up on.
- Evasion Down 4: northeast corner of level 2.

Turn the thing so the yellow is at the front.

- Monk Earrings: to the northwest.

Turn the alter ring so the green is at the front.

- Devil Loincloth (Kurando's Best Armour): use the yellow warp to head up to the 4th floor. 
- Death: take the green light up from 3rd to 4th, and it's to the south.

Turn the thing so the blue is at the front.

- Getitup: to the south-west, past the red warp.

Turn the thing so the green is at the front and watch the scene.

- Seventh Key: from the entrance, take the red warp to the second floor, then the yellow warp back to the first.  It's just to the north.
- Crucifix: take the blue warp from the first floor to the fourth, and it's in a chest nearby.

You may want to make an extra save before taking the warp up.

- Good ending: choose to live in peace.
- Bad Ending: choose to live life your own way.
- Reborn Droplet: go the graveyard after making a choice and examine the tree.  You'll need to have all summons levelled up to max for both Yuri and Kurando.
- Dark Seraphim: Go through the Door to the Labyrinth, then through the Door of Desires.

Tuesday, 27 May 2014

Shadow Hearts: Covenant - Yuri's Family

Here's a bit of trivia for you.  Yuri has beaten up every relative he has.

In the first Shadow Hearts game, he faces Ben/Jinpachiro multiple times, though, in fairness, this is a manifestation of his own issues and not literally his father's soul.

In Shadow Heatrts: Covenant, Yuri greets both his cousin and his aunt by attacking their fused forms.  He also defeats his own mother's reflection in the Glass Castle you enter when you first reach Goreme Valley.

Edit:  I tell a lie.  Yuri does not physically attack his great-grandmother in St Marguerite.  But, his mother attacks his reflection in the Glass Castle, and his aunt and cousin beat the crap out of one another.

Monday, 26 May 2014

Shadow Hearts:Covenant - Lottery Members

The lottery is an ongoing subquest throughout the Shadow Hearts series.  You win prizes by completing challenging judgement rings.  These prizes will ultimately include Joachim's ultimate armour, so it's worth playing!  The later players won't play unless you've completed earlier lotteries, so it's worth doing all of them.  You can only play if you have lottery tickets, which can only be found not bought, so try not to waste them.

You'll find the lottery members as follows:

  • Lottery 16: Automatically, in Le Havre.
  • Lottery 15: Southampton, in the northeast corner of the main square.
  • Lottery 14: In Rhondda Mine.  He's hiding in a dead end towards the east.
  • Lottery 13: Under the Convenir awning in Cannes.
  • Lottery 12: In a cell in St Marguerite Island.
  • Lottery 11: Natalya, a maid in the Hermitage.  She'll only be available after you've broken in via the catacombs.
  • Lottery 10: Return to Gepetto's apartment, just before heading back to Apoina Tower.
  • Lottery 9: In the Brick Warehouses in Yokohama.  The lottery player is Manuel to the southeast of the savepoint.  
  • Lottery 8: Battleship Mikasa, near the Cabin Key.   
  • Lottery 7: in Nihonibashi, near the pillar on the right at the end of the bridge. 
  • Lottery 6: Inugami Village - examine the tree behind the save point.  
  • Lottery 5:  Return to Azabu Kamiyashiki and check Locker 5 again.
  • Lottery 4: In Tiffauges Castle.   You'll find specific directions to this lottery and the next few here.
  • Lottery 3: In the Fort of Regrets.
  • Lottery 2: in the garden at Mukyo-An, after finding the other fourteen.
  • Lottery 1: outside the shop at Le Havre after finding all the others.


Shadow Hearts: Covenant - Karin's Sword Arts

You can power up Karin's Sword Arts by collecting pages of the Nibelung.  You'll find them as follows:

  • Nibelung Prelude: automatically, in Paris.
  • Nibelung Scene 4: speak to the man in the square in Southampton.
  • Nibelung Scene 7: Speak to the man near the fountain in Florence.
  • Nibelung Scene 2: automatically, in St Marguerite.
  • Nibelung Scene 5: speak to Old Boris while in Petrograd.
  • Nibelung Scene 8: check the skeleton near the save point, in the Catacombs under Petrograd.
  • Nibelung Scene 3: speak to Sukiyama on the Battleship Mikasa.
  • Nibelung Scene 6: Azama in the foreigner's cemetery in Yokohama. 
  • Nibelung Scene 9: from Sefo the Barfly in Southampton. 
  • Nibelung Finale: after finding all the previous scenes, examine the wall behind the statue in the final area of the Queen's Garden (go back in after defeating the boss).

Shadow Hearts: Covenant - Wolf Bout

The Wolf Bouts involve fighting a number of other wolves in order to power up Blanca's abilities and obtain his best weapon.  The trickiest bit is making sure you're protected against whatever status effect each wolf uses.

You'll find the wolves as follows.

  1. In Paris, impossible to miss.  You'll also obtain a point card at this stage, which the other wolves will sign.
  2. Return to the Wine Cellar, and you'll find the wolf where you fought the boss.
  3. In Florence, to the left of the save point.
  4. In the SG Italian Branch HQ, on the third floor after defeating the boss.
  5. Automatic, on St Marguerite Island.
  6. Return to Petrograd before heading to Goreme Valley.  You'll find the wolf in the alleyway where Anastasia hid.
  7. In the catacombs under Petrograd.  He's in a cell near the Ring Soul.
  8. Speak to Nagy near the well in Domremy, then head out to the woods.  The wolves are in the east.
  9. In the Battleship Mikasa.  Return to the area after defeating the boss.  You'll find the wolf in Kurando's area, in the second south turn.  Protect against petrify.
  10. Nihonibashi, in the park to the east.
  11. Inugami Village, near the waterfall. 
  12. Inside the immortal mountain.  Put the blue crystal in the first warp, the red in the one to the west in the next area, and use yellow at the next altar.  Protect against Death. 
  13. Inside Tiffauge Castle.  More specific directions are given here.  It's in the southeastern-most room. 
  14. In the Forest of Wind, in the middle of the path.
  15. Automatically, when you return to Montmartre.

Shadow Hearts: Covenant - Spoiler-Free Item Guide Part 5, Yokohama to Asuka Stone Platform.

Part 4

Ring Soul
Character Abilities/Ultimate Weapons or Armour
Lottery Members
Crests 


Yokohama

Brick Warehouse

- Dandy's Kimono: in the chest visible as soon as the scene ends.  It's to the north-east.
- Naberius: after the forced battles, it's to the north.
- Seal of Speed: in a warehouse to the northwest.
- Mana Root: in a chest in a warehouse to the northwest.
- Lottery Ticket: in a warehouse to the west.
- Small Jug: in a warehouse to the west.
- Hit Area Expand: in a chest in a warehouse to the west.
- Silver Rasp: Chest near the save point.
- Giant Pillar: with Joachim, examine the pillar in the western warehouse.
- Cimeies: buy from Secret Dealer Kensuke in the northwest warehouse.
- Racoon Toy: buy from Secret Dealer Kensuke.
- Lottery 9: Manual Labourer Murai, to the southwest of the save point.

Yokohama Streets

- Soul Drop: after the scene, check just to the north of the old man.
- Amdusias: go south from the save point.  It's in a chest just before the screen changes.
- Mr. Doctor: hidden just in front of Gerard's van.
- Beastmaster: give Pierre the Racoon Toy.  You should have enough cards to make all the dresses including this one.
- Shining Oil: speak to Tomoko three times.
Ring Soul: from Gerard, go south.  The Ring Soul is in an alley to the west.
- The Sun: north of the Ring Soul.

Battleship Mikasa

Ring Soul: in the boxes to the north, right at the beginning.
- Vapula: underneath the stairs leading up to the boat.
- Nibelung Scene 3: speak to Sukiyama at the top of the stairs.
- Security Key 1: in a chest visible after going below decks.
- Security Key 2: in the first room you come to with Yuri's team.
- The Lovers: Kurando's team will find it in the southeast.
- Cabin Key: after Yuri goes through Door 3, it's straight ahead.
- Lottery 8: down the south corridor near the Cabin Key.
- Lottery Ticket: Yuri will find it in the cabin.
- Instant Death 2: Yuri will find it in the cabin.  This is Treasure:Sneak.
- Vine: after Kurando goes through door A, it'll be opposite switch B.
- Tent: in the northeast of the room where the two teams meet.


Ouka

Do not pick up any items, they will not sync to Yuri's inventory.

Yokohama Streets

- Treasure:Roamer: speak to Croft, in the alleyway north of the save point.


Foreigner's Cemetery

- Sp-Defend Down 3: north of the save point.
- Pure Root: from the shop, take the first left, and it'll be in the middle of the clearing.
- Calming Charm: take the next left, and it'll be in the dead end.

Go back to the entrance and take the first right.

- Strike Expand: in the first open area.
- Dispelling Charm: take the first right then the left after the strike expand.  The other paths from this area loop round in a circle.

Go back to the start, go left then right along the last red path.

- Fifth Key: just before the save point, there's a little path which goes slightly down beside the path.  The chest is at the end of it.

Imperial Capital


Nihonibashi
 
- The Tower: behind the pillar at the end of the bridge.  On the right.

Head west at the fork.

- Daphne Fruit: examine the door to the northwest just before the screen changes.
- Lottery Ticket: examine the wall next to the well-dressed man standing outside the park.
- Emcee's Desk: examine the desk behind the ring.
- Buer: to the east of the ring.
- Artem Buster: fight Great Gama. I suggest using the Mind's Eye.

Go back to the fork and go east.

- Mana Extract: examine the telephone pole near the save point.
- Seal of Wisdom: northwest of the park. 

After the battle, Sara is standing next to the park though there are no new pit fights to attempt right now.


- Extreme: only available if you have a 65% ring perfect rate.

A Few Things to Take Care Of ...

Foreigner's Cemetery

Ring Soul: on the grass, just to the south of the entrance.
- Nibelung Scene 6: speak to Azama.
- Soul Drop: examine one of the graves.

Battleship Mikasa

- Wolf Bout 9: from the save point, go through the top left door to Kurando's area.  The wolf is in the dead end to the south right after Door 4, the equivalent of where you found the lottery in Yuri's area.  Guard against petrify.
- Foras:  from the Wolf, head all the way to the area in the southwest.  You'll come to the Captain's cabin where he'll ask you a few questions.


Nihonibashi

- Lottery 7: near the pillar on the right at the end of the bridge.  
- Wolf Bout 10: in the park, near the Seal of Wisdom.


Imperial Capital

Hojo Research Lab

- Loin Guard: after the scene, head into the eastern room which held Nicolai.  Examine the contraption.
- Evasion Down 3: chest in the southeast of the large room to the north of the save point.
- Thera Root: enter the large room, and go up the stairs on the northwest.  Follow the path around to find the Thera Root.
- Lottery Ticket: once in the tunnels you explored with Ouka, go to the far east.
- Dragonsword: in a southern alleyway in the second part of the tunnels.
- Lottery Ticket: examine the shooting gallery.
- Strike Expand: you'll find it in the northeastern corner of the corridor after the shooting gallery.
- Pure Root: dead end to the south.
- Strike Expand: dead end to the west in the next area.
- Step Tripler: when you reach an area with a fourway intersection, you'll find it to the west.
- SP-Attack Down 3: on Ouka's bed.
- Daphne Fruit: north of the save point.
- Seal of Luck: halfway up the stairs, hidden against a far wall.
- Fifth Key: in a chest, a few levels up from the Seal of Luck.
- Tent: chest at the top of the stairs.

Forest of Wind

- Seal of the Soul: to the right of the path.

 Purgatory

- Strike Expand: top right of the triangle.
- Mana Root: top left of the triangle.
- Hit Area Expand: mid-left of the triangle.

Inugami Village

- Soul Drop: in the hut near the entrance.  You can unlock all of Yuri's forms now.
- Lottery 6: examine the tree behind the save point. 
- Silver Angel: behind the rack of drying vegetables.
Ring Soul: northeast corner of the village.
- Valefor: just to the right of the Ring Soul.

- Clay Idol: halfway along the path to the shrine.

- Lottery Ticket: under the stairs in the house.
- Sunrise Oil: in Saki's room, near the window.
- Seal of Aura: in Saki's room, to the right of the bed.
- The Star: to the right of the entrance to Saki's house.

A Few Things to Take Care Of...


Forest of Wind

- Malphas: take the right path and it's right at the end.

- Blood Jewel: go back to the screen with the fork from the right path.  Without moving, hit X and you should get it.  This is Treasure:Roamer.

Yokohama Streets

- Treasure: Done: speak to Lord Croft.

Mukyo-An

- Dog Bone: this is Treasure:Done.  You'll find it near the pond in the garden.

You can also make some progress with the Straw Millionaire Quest at this point.

Yokohama

- Talking Panda: Trade the Fine Tea Set to Akiko the celebrity on Yokohama Street.
- Strongoids: trade the Fine Tea Set to Kitayama in the Brick Warehouses.  This is a bad trade which ends the quest. 
- Bune: buy from Dangerous Toys store in the Brick Warehouses.

Inugami Village

- 10-Day-Old Rice:  Trade the Talking Panda to Ichizumi.  He's on the path to the spring in Inugami village.
- Third Key: Trade the Talking Panda in Nihonibashi, but, again, that's a terrible trade.
- Wolf Bout 11: near the waterfall.

Southampton
Head back to Southampton.

- Nibelung Scene 9: from Sefo the rescued Barfly.
- Research Paper: trade the 10-Day-Old Rice to Fusty Fleming, upstairs in the Inn.

Paris (Montmartre)

- The Emperor: speak to Ernest.

Immortal Mountain

- Thera Extract: after the save point, hug the left wall and it'll pop up.
- Samigina: take the right fork and it's at the end.  You can complete another area of the Solomon's Key now.
- Red Crystal: take the left fork.

Head back to the green altar and enter the red crystal.

- Blue Crystal: after warping, take the first left turn.

Head back to the altar to the south and put the blue crystal in.

- Yellow Crystal: at the end of the south path, impossible to miss.

Put the yellow crystal on the altar in the east of this area.

- Hades Fan: take the left fork, and it's right at the end.

Head right back to the beginning, taking all the crystals out of the altars on the way.  Put the blue crystal into the first altar, the one you just took the red crystal out of.  Put the red crystal into the next altar to the west, behind the loop.

- Orias: chest to the right of the path.
- Wolf Bout 12: from Orias, keep moving forward, using the yellow crystal as appropriate.

Head back to the beginning, picking up all the crystals on the way.  Put the red crystal in the first altar, and the blue crystal in the altar to the north.

Ring Soul: take the south fork.  This is the last one - you should be able to give all your characters the maximum attacks now.

After using the yellow crystal in the next altar:

- Seal of Life: end of the left fork.
- Thera Extract: head right, and it's at the chest in front of the last fork.  Go back to the most recent fork.
- Kogara-Maru: chest to the south on the next screen.
- Mana Extract: after the scene, check the right of the bridge
- Flare Brooch: left side of the bridge, about halfway across.

A Few Things to Take Care of...

Le Havre

 - Dark Tower: head down to the shop and face the peach bat.

Zurich 
 
- Anne's Cross: automatic

Montmartre

- Seventh Key: speak to Ernest's wolf.

Azabu Kamiyashiki


- Lottery Ticket: in the second room, near the save point.
- Locker 5 Key: Up the stairs, in the room to the left of the save point.
- Locker 1 Key: Up the stairs, in the room to the left of the save point.
- Seal of Strength: Up the stairs, in the room to the left of the save point.

Head back downstairs to the locker room.

- Mind's Eye: Locker 1.
- Pure Extract: Locker 5.
- Power Cannon: use Snapshot on Mecha Lord. 
- Lottery 5: Check Locker 5 after the boss fight.

Queen's Garden


- Thera Extract: through the first door to the north.
- Knight: through the first door to the north.

Come out of there and head west.

- Hit Area Expand: in the first circular room you come to.
- Lottery Ticket: in the room east of the Hit Area Expand.
- Pawn: in the room east of the Hit Area Expand.

Now head all the way around to the equivalent room on the eastern side of the dungeon.  Go south.

- Paralysis 3: in a torch between the southernmost and easternmost circular rooms.
- Queen: chest in the middle of the room.
- Seal of Force: by the side of the bed.

Now go to the northernmost circular room, and unlock the door to the south.

- Flamberge: behind a table.
- King: use the Knight on the chess board.

Head back to where you fought the boss.

- Gusion:  Examine the altar.
- Nibelung Finale: if you have all the other scenes, examine the wall behind the statue.

Enter the Asuka Stone Platform to make sure the sidequests are triggered.

Part 6

Shadow Hearts: Covenant - Ultimate Weapons and Armour Guide

Sidequests are dealt with in this post, unless a more specific link is given. Some, including the Straw Millionaire quest take place throughout the game, so you can refer to my walkthrough here.

Yuri

  • Chimera Claw: After defeating Orobas in Neam, exit to the world map.  Return to Roger Bacon and complete a spin ring to obtain the Chimera Claw.
  • Bike Jacket: complete the Lenny sidequest. 
  • Ability: fusion.  Find six soul drops to upgrade your souls to level 3.  After doing that,  maxing out Yuri and Kurando's soul charge, and answering Jeanne's question at the end of the game,  examine the tree in the Graveyard for Dark Seraphim.

Gepetto

  • Crimson Thread: Complete the Doll's House sidequest.
  • Puppeteer's Cape: prize for completing Solomon Trials.
  • Ability: Cornelia's dresses.

Blanca


Karin

  • Durandel: Complete the Fort of Regrets sidequest.
  • Microskirt: prize for 10,000 steps from the walker in Cannes.
  • Ability: Sword Arts.  Collect pages of the Nibelung.

Joachim

  • Nautilus: part of the Fort of Regrets sidequest.
  • Rose Bondage: prize from Lottery 1.
  • Ability: Muscle Arts.  Defeat the Great Gama to unlock more Muscle Arts and complete the Man Festival to unlock the Great Question form.

Lucia

  • Nemesis Fan: trade for it using the Straw Millionaire sidequest, or buy for 500,000 in the Cathedral Shop in Notre Dame.
  • Dancer's Stars: in a chest in the Azuka Stone Platform.
  • Ability: Aromatherapy Oils and Tarot Cards.  You can pick up the cards in various locations.

Anastasia

  • Gold Angel: speak to Edgar after finding five Silver Angels.
  • Prayer Robe: from the Queen in the Hermitage. 
  • Photo Albums: take photos of certain monsters to unlock new albums.

Kurando

  • Mumeiro: complete the Dog Shrine sidequest.
  • Devil Loincloth: in a chest in the Azuka Stone Platform.
  • Morph: complete the Dog Shrine sidequest to unlock Jutendouji.

Tuesday, 20 May 2014

Shadow Hearts: Covenant - Spoiler-Free Item Guide Part 4, Idar Flamme to End of Disc One

Part 3

Ring Soul
Character Abilities/Ultimate Weapons or Armour
Lottery Members
Crests 

Idar Flamme

This area is ridiculous, so here's a map from the Let's Play. 


- Direct Press Album: take a picture of Hati (random battle).
- Mana Root: at the first fork, go left, and it'll be before the forced battle - marked 2 on the map.
- Jupiter Fan: after the mana root, take the next left.

From the Fan, carry on to the next junction and take the northeastern route.  Take the next left, then the next right to a dead end with two chests, marked 7 on the map.

- Thera Root
- Silver Bracelet


Head back to the entrance, then from the entrance, take every right turn.  Eventually, you'll reach a corner with three chests. marked 4 on the map.

- Cosmic Bracelet
- Soul Benediction
- Strike Expand

From the dead end, head back to the junction.  Take the northwestern route, then the next left turn.

- Bat's Gold: marked 6 on the map.

From the Bat's Gold, carry on to the junction and head south.  At the next turn, go south again to the Paralysis 2.

- Paralysis 2: marked 3 on the map.

At the shop (8), give Pierre the Purple Bondage outfit from the Hermitage, and he'll design a new outfit.  You should have enough stud cards to create all the outfits now, including the new one.

 In the next area, take the western most path north. 

- Feather Bracelet: on the right of this path.

Hit the switches and go through the door near the bracelet.

- Hit Area Expand: on the other side of the door.

- Third Key: From the start of this area, take the eastmost path north.

- Will Power: in the north-eastern most corner of the area.
- Pure Root: just after the door north of the save point.
- Seal of Speed: left of where you fought Mother Filaria.
- Replacement Man: northeast of where you fought Mother Filaria.

A few things to take care of...

- Soul Drop: next to the alter in the church in Domremy. 
- Wolf Bout 8: speak to Nagy near the well in Domremy, then into the woods near the town's entrance.  There's a group of three wolves to the east.
- Soul Drop: complete the Chests Game in the Wine Cellar again. 
- Alloces Crest. : Lottery 10, Gepetto's apartment in Paris.  You can complete an area of the Solomon's Key at this point.
- Zagan Crest: show Ernest in Montmartre your Wolf Bout stamps.
- Silver Chair: an accessory for Gepetto.  Buy it for 10,000 from the Junk Shop near the Paris Cathedral. 
- Deathtron Hammer: Defeat Great Gama in Southampton.
- Asmodeus: Head to Petrograd.  Elio, who is standing to the left of the bridge south of Edgar's shop will sell it to you.

- Treasure:Sneak: speak to Lord Croft in Cannes. 
- Soul Drop: speak to Lawrence in the alter room in Goreme valley.  You'll be able to access the Monk pit fights now. 

Remember to catch up on the Straw Millionaire Sidequest at this point.  If you picked up a Super Piroshki in Petrograd, you can trade it for the following;

- Fine Tea Set: Gourmet Connoisseur Ginori in Florence.

- Talking Panda: Zinedine of Mitsuboshi in Champs Elysees. 


Apoina Tower (Again)

- Belial: Head up the west stairs and outside; it's in a visible chest.
- Strike Expand: Head up the west stairs and outside; it's in a visible chest.
Ring Soul: head up the east stairs; you'll find the Ring Soul in a little nook on the left of the second floor.
- Murderer's Wt: chest to left of scales.
- Kidnapper's Wt: chest to southwest of scales.
- Arsonist's Wt: chest in cell to right of scales.
- Thief's Wt: chest in cell southeast of scales.
- Pure Extract: after walking across the cage-bridge, it's on the left.
- Seal of the Soul: up the stairs to the right after walking across the cage-bridge.
- Hit Area Expand: north of the third level of the cage puzzles.
- Paimon: the third lever has three options; set it to the lowest level, go back down and open the chest.  You can complete an area on the Solomon Key now.

Part 5